Blazor Talk “Look ma, no JS, it’s Blazor” code & slides

So, it was a blast, if you came to my talk on the .NET Zurich User Group https://www.meetup.com/dotnet-zurich/events/264182822/, thanks for coming!

My slides and code are here: https://github.com/joslat/BlazorTalk15Nov2019

The downloadable Code is a fork from Steve Sanderson’s code which I adapted to run on the latest bits.

Code (forked and modified): https://github.com/joslat/presentation-2019-10-NDCSydney

The original can be found here: https://github.com/SteveSandersonMS/presentation-2019-10-NDCSydney

blazorred

Ah, in addition, the example in native UI with Blazor is covered in the following video: https://www.youtube.com/watch?v=6BT2AF9PO5g, in minute 55.30.

Also, from that same talk. I have the confidence than watching the talks from Steve Sanderson is a good way to keep yourself up to date with this quite interesting technology, so “Shall we?” 😉

PS: I did a PR with the three modifications but probably there will be no time to review or will be ignored 😉


Have fun!


Creating a Serverless RESTful API with Azure Functions Part 2 – Creating the API

On today’s post we will be creating our Serverless REST API with Azure Functions. We will be doing that with Visual Studio.

This post is part of a series where the first part should be read beforehand.

Creating the “basic MM Service”

For this we have to install the latest Azure Functions Tools and an operative Azure Subscription. We can do this from Visual Studio, from either “Tools” and then “Extensions and Updates”, we should either install or update the latest Azure Functions and Web Jobs Tools” (if we are using VS 2017) or if we are in VS2019, we should go to Tools, then “Get Tools and Features” and install the “Azure development” workload.

We should create a new “Azure Functions” template based Project.

01 create Azure Function

And select the following options:

  • Azure Functions v2 (.NET Core)
  • Http trigger
  • Storage Account: Storage Emulator
  • Authorization level: Anonymous

02 AZ Func creation config.PNG

Then we can click create and just run it to see it working. Pressing F5 should start the Azure Functions Core Tools which enables us to test our functions locally, a convenient feature I’d say. Once starting we should see a console window with the cool Azure Functions logo flashing.

03 AZ functions core tools.PNG

then once the startup has finished copy the function URL, which in our case is “http://localhost:7071/api/Function1”.

04 AZ functions core tools URL.PNG

To try this from  a client perspective we can use a browser and type “http://localhost:7071/api/Function1?name= we are going to build something better than this…” but I’d rather use a serious tool like Postman and issue a GET request with a query parameter with key “name” and the Value “we are going to build something better than this…”.  This should work right away and also some tracing should appear on the Azure Functions Core Tools. The outcome in Postman should look like:

05 consuming our Micky Mouse with Postman.PNG

Or if you opted for the browser test “Hello,  we are going to build something better than this…” – which we are going to do in short.

We just saw a “Mickey Mouse” implementation but if you are like me, that won’t satisfy you unless you add some layers in to decouple responsibility and some interfaces because, er… we like complication right? 😉 –  Not really but I thought it would be good to put in code which does something simple but is still as SOLID as I can get without too much effort.

What are we going to build?

We are going to create a REST API that exposes a simple list of categories (a complex POCO with Id and Name), then the API Controller which will be the main API interface and it will delegate obtaining the Data to a Service and the Service to a Repository.

And we will stop here, so this will be completely on memory so no Database will be hurt in the process, also no Unit Of Work will Need to be implemented as well.

We will create some interfaces and configure/register them with Dependency Injection, which uses the ASP.NET Core DI basically.

I have a disclaimer which is that WordPress has somehow disabled HTLM editing so I can’t put code from GIT or have a nice “code view” in place which is… making me think of switching to another blog provider… so if you have any suggestion, I’d appreciate you mention it to me with a comment or directly.


Creating the “boilerplate”

We will start by creating the POCO (Plain Old CLR Object) class, Category. For this we can create a “Domain” Folder and inside it create a “Models” Folder where we will place this class:

    public class Category 
    {
        public int Id { get; set; } 
        public string Name { get; set; }
    }
Next we will implement the Repository Pattern which is used normally to abstract us from the data management for a concrete Entity. Usually we encapsulate on this classes all the logic to handle data like Methods to list all the data, create, edit, delete or recover a concrete data element. These operations are usually named CRUD, for Create/Read/Update/Delete and are meant to issolate data acess operations from the rest of the application.
Internally These Methods should talk to the data storage but as we mentioned, we will create an in memory list and that will be it.
Inside the “Domain” Folder we will create a “Repositories” Folder, on it we will add a “ICategoryRepository” interface as:
    public interface ICategoryRepository
    {
        Task<IEnumerable<Category>> ListAsync();
        Task AddCategory(Category c);
        Task<Category> GetCategoryById(int id);
        Task RemoveCategory(int id);
        Task UpdateCategory(Category c);
    }
And a class CategoryRepository which implements this interface..
    public class CategoryRepository : ICategoryRepository
    {
        private static List<Category> _categories;
        public static List<Category> Categories
        {
            get
            {
                if (_categories is null)
                {
                    _categories = InitializeCategories();
                }
                return _categories;
            }
            set { _categories = value; }
        }

        public async Task<IEnumerable<Category>> ListAsync()
        {
            return Categories; 
        }

        public async Task AddCategory(Category c)
        {
            Categories.Add(c);
        }

        public async Task<Category> GetCategoryById(int id)
        {
            var cat = Categories.FirstOrDefault(t => t.Id == Convert.ToInt32(id));

            return cat;
        }
        public async Task UpdateCategory(Category c)
        {
            await this.RemoveCategory(c.Id);
            Categories.Add(c);
        }

        public async Task RemoveCategory(int id)
        {
            var cat = _categories.FirstOrDefault(t => t.Id == Convert.ToInt32(id));
            Categories.Remove(cat);
        }

        private static List<Category> InitializeCategories()
        {
            var _categories = new List<Category>();
            Random r = new Random();

            for (int i = 0; i < 25; i++)
            {
                Category s = new Category()
                {
                    Id = i,
                    Name = "Category_name_" + i.ToString()
                };

                _categories.Add(s);
            }

            return _categories;
        }
    }
This Repository will  be talked to only by the Service, whose responsibility is to ensure the data related Tasks are performed agnostically from where the data is stored. As we mentioned, the Service could Access more than one repository if the data was more complex. But, as of now it is a mere passthrough or man-in-the-middle between the API Controller and the Repository. Just trust me on this… (or search for “service and repository layer”) a good read on this here
There we have all wired by an in-memory list of categories List<Category> named oportunely Categories, which is populated by by a function named InitializeCategories().
So, now we can go and create our “Services” Folder inside the “Domain” Folder…
We should add a ICategoryService interface:
    public interface ICategoryService
    {
        Task<IEnumerable<Category>> ListAsync();
        Task AddCategory(Category c);
        Task<Category> GetCategoryById(int id);
        Task RemoveCategory(int id);
        Task UpdateCategory(Category c);
    }
Which matches perfectly the functionality of the Repository, for the reasons stated, but the objectives and responsabilities are different.
We will add a CategoryService class which implements the ICategoryInterface:
    public class CategoryService : ICategoryService
    {
        private readonly ICategoryRepository _categoryRepository;

        public CategoryService(ICategoryRepository categoryRepository)
        {
            _categoryRepository = categoryRepository;
        }

        public async Task<IEnumerable<Category>> ListAsync()
        {
            return await _categoryRepository.ListAsync();
        }

        public async Task AddCategory(Category c)
        {
            await _categoryRepository.AddCategory(c);
        }
        public async Task<Category> GetCategoryById(int id)
        {
            return await _categoryRepository.GetCategoryById(id);
        }
        public async Task UpdateCategory(Category c)
        {
            await _categoryRepository.UpdateCategory(c);
        }
        public async Task RemoveCategory(int id)
        {
            await _categoryRepository.RemoveCategory(id);
        }
    }
With this we should be able to implement the Controller without any Showstopper..

Adding the necessary services wiring up

This is where everything comes together. There are some changes though, due to the fact that we will be adding dependency injection to setup the services. Basically we are following the steps from the official Microsoft how-to guide which in short are:

1. Add the following  NuGet packages:

  • Microsoft.Azure.Functions.Extensions
  • Microsoft.NET.Sdk.Functions version 1.0.28 or later (at the moment of writing this, it was 1.0.29).

2. Register the services.

For this we have to add a Startup method to configure and add components to an IFUnctionsHostBuilder instance. For this to work we have to add a FunctionsStartup assembly attributethat specifies the type name used during startup.

On this class we should override the Configure method which has the IFUnctionsHostBuilder as a parameter and use this to configure the services.

For this we will create a c# class named Startup and put the following code:

[assembly: FunctionsStartup(typeof(ZuhlkeServerlessApp01.Startup))]

namespace ZuhlkeServerlessApp
{
    public class Startup : FunctionsStartup
    {
        public override void Configure(IFunctionsHostBuilder builder)
        {
            builder.Services.AddSingleton<ICategoryService, CategoryService>();
            builder.Services.AddSingleton<ICategoryRepository, CategoryRepository>();
        }
    }
}

Now we can use constructor injection to make our dependencies available to  another class. For example the REST API which is implemented as an HTTP Trigger Azure Function will resolve the ICategoryServer on its Constructor.

For this to happen we will have to change how this HTTP Trigger is originally built (hint: It’s Static…) so we need it to call its constructor..

We will remove the Static part on the generated HTTP Trigger function and the class that contains it or either generate a complete new file.

We will either edit it or add a new one with the name “CategoriesController”. It should look like follows:

    public class CategoriesController
    {
        private readonly ICategoryService _categoryService;
        public CategoriesController(ICategoryService categoryService) //, IHttpClientFactory httpClientFactory
        {
            _categoryService = categoryService;
        }
..

The dependencies will be resolved and registered at the application startup and resolved through the constructor each time a concrete Azure Function is called as its containing class will now we invoked due it is no longer static.

So, we cannot use Static functions if we want the benefits of dependency injection, IMHO a fair trade off.

In the code I am using DI on two places, one on the CategoriesController and another on an earlier class already shown, the CategoriesController. Did you realize the constructor injection?


Creating the REST API

As stated on the earlier section, we removed the static from the class and the functions.

Now we are ready to finish implementing the final part of the REST API… Here we will implement the following:

  1. Get all the Categories (GET)
  2. Create a new Category (POST)
  3. Get a Category by ID (GET)
  4. Delete a Category (DELETE)
  5. Update a Category (PUT)

Get all the Categories

Starting with getting all the categories, we will create the following function:
        [FunctionName("MMAPI_GetCategories")]        
        public async Task<IActionResult> GetCategories(
            [HttpTrigger(AuthorizationLevel.Anonymous, "get", Route = "categories")]
            HttpRequest req, ILogger log)
        {
            log.LogInformation("Getting categories from the service");
            var categories = await _categoryService.ListAsync();
            return new OkObjectResult(categories);
        }
Here we are associating “MMAPI_GetCategories” as the function Name, adding “MMAPI_” to relate them together in our Azure UI, as everything we deploy as a package will be put togher and using a naming convention will be convenient for ordering and grouping.
The Route for our HttpTrigger is “categories” and we associate this function to the HTTP GET verb without any Parameters.
Note here we are using async as the Service might take some time and not be inmediate.
Once we get the list of categories from our service, we return it inside the OkObjectResult

Create a new Category

For creating a new Category we will create the following function:
        [FunctionName("MMAPI_CreateCategory")]
        public async Task<IActionResult> CreateCategory(
    [HttpTrigger(AuthorizationLevel.Anonymous, "post", Route = "categories")] HttpRequest req,
    ILogger log)
        {
            log.LogInformation("Creating a new Category");

            string requestBody = await new StreamReader(req.Body).ReadToEndAsync();
            dynamic data = JsonConvert.DeserializeObject<Category>(requestBody);

            var TempCategory = (Category)data;

            await _categoryService.AddCategory(TempCategory);

            return new OkObjectResult(TempCategory);
        }

This will use the POST HTTP verb, has the same route and will expect the body of the request to contain the Category as JSON.

Our code will get the body and deserialize it – I am using the Newtonsoft Json library for this and I delegate to our Service interface the Task to add this new Category.

Then we return the object to the caller with an OkObjectResult.

Get a Category by ID

The code is as follows, using a GET HTTP verb and a custom route that will include the ID:

        [FunctionName("MMAPI_GetCategoryById")]
        public async Task<IActionResult> GetCategoryById(
            [HttpTrigger(AuthorizationLevel.Anonymous, "get", Route = "categories/{id}")]HttpRequest req,
            ILogger log, string id)
        {
            var categ = await _categoryService.GetCategoryById(Convert.ToInt32(id));            
            if (categ == null)
            {
                return new NotFoundResult();
            }

            return new OkObjectResult(categ);
        }

To get a concrete Category by an ID, we have to adjust our route to include the ID, which we retrieve and hand over to the categoryservice class to recover it.

Then if found we return our already well known OkObjectResult with it or, if the Service is not able to find it, we will return a NotFoundResult.


Delete a Category

The Delete is similar to the Get  by ID but using the DELETE HTTP verb and obviously a different logic. The code is as follows:
        [FunctionName("MMAPI_DeleteCategory")]
        public async Task<IActionResult> DeleteCategory(
            [HttpTrigger(AuthorizationLevel.Anonymous, "delete", Route = "categories/{id}")]HttpRequest req,
            ILogger log, string id)
        {
            var OldCategory = _categoryService.GetCategoryById(Convert.ToInt32(id));
            if (OldCategory == null)
            {
                return new NotFoundResult();
            }

            await _categoryService.RemoveCategory(Convert.ToInt32(id));
            
            return new OkResult();
        }
The route is the same as the previous HTTP Trigger , we also do a Retrieval of the Category by Id. Then the change happens if we find it, then we ask the Service to remove the category.
Once this is complete we return the OkResult. Without any category as we have just deleted it.

Update a Category (PUT)

The Update process is similar as well to the delete with some changes, Code is as follows:

        [FunctionName("MMAPI_UpdateCategory")]
        public async Task<IActionResult> UpdateCategory(
            [HttpTrigger(AuthorizationLevel.Anonymous, "put", Route = "categories/{id}")]HttpRequest req,
            ILogger log, string id)
        {
            var OldCategory = await _categoryService.GetCategoryById(Convert.ToInt32(id));
            if (OldCategory == null)
            {
                return new NotFoundResult();
            }

            string requestBody = await new StreamReader(req.Body).ReadToEndAsync();
            var updatedCategory = JsonConvert.DeserializeObject<Category>(requestBody);
            await _categoryService.UpdateCategory(updatedCategory);

            return new OkObjectResult(updatedCategory);
        }

Here we use the PUT HTTP Verb, receive an ID that indicates us the category we want to update and in the body, just as with the Creation of a new category, we have the Category in JSON.

We check that the Category exists and then we deserialize the body into a Category and delegate to the service Updating it.

Finally, we return the OkObjectResult containing the updated category.


Deploying the REST API

We could now test it in local as we did at the beginning but what’s the fun of it, right?
So, in order to deploy it to the cloud we will Need to have a Microsoft Account logged in our Visual Studio that has an Azure subscription associated to it.
We will build it in release and then go to our Project, right click and choose “Publish..”
06 Publishing our REST API.PNG
We will choose “Azure Function App” as publish target and “create new”. Also it is recommended to mark the “Run from package file” which is the recommended option.
07 Publishing configuration 01.PNG
And click on “create profile”. There we will be presented into the profile configuration, where I recommend we create all the resources and do not reuse.
Regarding the Hosting Plan, be sure to check the “Consumption plan” which has like 1Milion of API Calls before any charge is made, which is convenient for testing purposes I’d say.
08 Publishing configuration 02.PNG
Note that when I publish this post this app service will be long gone so no issues in Posting it :).
Once configured we should click on “Create” and wait for all the resources to be created, once this is done the Project will be built and deployed to Azure.

Checking our Azure REST API

Now it is a good moment to move to our favorite web browser and type portal.azure.com.
We can move right away to the resource group we created and into the App Service created. Sometimes, when Publishing the Functions are not populated.
if that happens, don’t panic, just re-publish it again. The Publish view should look like:
09 Publishing again if no functions.PNG
A bit after, we should be able to see our services in our App Service:
10 Our REST API in azure.PNG
To try this quickly, we should go to the GetCategories, click on the “Get function URL” and copy it.
11 Get function URL
Then we can go into our friend PostMan, set a GET HTTP request and paste the URL we just copied in the, er, URL Field. And click Send.
We should see something like:
12 Trying from Postman out new Azure Function REST API
We could also test this on a web browser and on the Test section on the Azure portal, but I like to test Things as close as customer conditions.
As next steps I throw you the challenge to test this Serverless REST Api we just build in Azure with Azure Function Apps. I’d propose to try to create a new Category such as “999” – “.NET Core 3.0” then retrieve it by ID, then modify it to “.NET 5.0”, retrieve it and end up deleting it and trying to retrieve it again just to get the “NotFoundResult”.
So, what do you think about Azure Functions and what we just have build?

Next..

And that’s it for today, on our next entry we will jump into API Management .

Happy Coding & until the next entry!


Creating a Serverless RESTful API with Azure Functions Part 1 – Introduction

Azure latest (and in my opinion greatest) trend is Serverless, it’s cool, anything serverless can scale seamessly and if done right, be elastic and adapt to a dynamically changing load… which makes it ideal for implementing Microservices..

That said I am pretty new to Azure at the moment but nonstop learning, about in 1 or 2 weeks to face the AZ-203 exam as mentioned some weeks ago

But I like to play and this is the outcome of some trying and managing to get something close to a “proper” REST API endpoint in Azure, along with OpenAPI and some Azure provided goodies..

What and how?

So, what will we exacltly be doing and how will we do it?

I will be implementing a REST API endpoint using Azure Functions through a HTTP Trigger and C#, implementing it with Visual Studio 2019.

Then, I do plan to implement OpenAPI support with Azure API Management, which has several benefits as getting the documentation and test layer done almost automatically for us.

This said, I initially had thought of using an Azure Function Proxy (introduced by the end of 2017) as the front-end for the implemented API, which as well as some benefits like redirecting it to a Mock while the API is in development or being able to play between a Staging and an experimental new version of the API, etc.. But it seems that API Management does this and much more so I am unsure I will be using this feature… to understand it, this diagram might be of help:

Solution-Architecture-Diagram

So basically the Proxy acts as a facade between a user-consumer-publisher of our API and our API (Azure Function on the diagram). There we can do transformations of the request, response, redirect it to another Azure Function or service, etc..

As said, I’ll use API Management and not dig into Azure Functions Proxies.

Also, I do not plan into digging into authentication-authorization but that might change as we progress into it.


Azure Functions 101

Azure Functions are a great solution for running quick functions, this meaning 2,5 minutes for a HTTP based response (usually 5 minutes, modifiable up to 10 minutes).

They can be implemented with several languages, including C#, and supports dependencies as NuGet.

They Support integrated security with OAuth as Azure Active Directorz, Facebook, Google, Twitter, etc..

Integrates perfectly with various Azure and 3rd party services.

FaaS/LaaS or PaaS – mainly they are Serverless so that means “Function as a Service” or also named “Logic as a Service” but we can change the pricing plan from the default “Consupmtion” to “App Service”. So, basically a “Web API”. That said, the Consumption plan right now comes with 1 million executions for free a month, which is not bad, right?


Azure Functions Proxies

The Azure Function Proxies act as a single URI, a unified facade which we can use some redirections and transforms to our convenience, like:

  • Request and Response overrides.
  • Modify input request to send different HTTP verbs, headers or query parameters to a hidden backend service.
  • Replace Backend response status code, headers and body.

This said, API Management supersedes Azure Function by large. That said, they have their role, if we only want to unify separate functions or API services into a single API, we should use Azure Functions Proxies.

If we want a API Management, then we know what to use.

That said, it might be interesting if we have a somehow complex environment. As said, an image is worth 1000 words:

api-management_500x259

So it could be used to unify several related API micro-services, whilst having a greater API facade which Manages them all.

Or to mock an Azure Function..

As we will implement something way simpler, I’d go for the API Management. Also, it seems more fun.


API Management

API Management enables a full fledged professional facade/gateway for our API, providing in-built services which support all that the Azure Functions Proxies can do plus:

  • Load Balancing
  • Hot Swapping
  • Rate limiting
  • Authentication and Authorization
  • IP Whitelisting
  • Access Policies
  • Caching
  • Subcriptions, including User and RBAC management
  • Licensing
  • Business Insights & Analytics
  • Developer Portal (for ISV partners and-or internal use, including API documentation, interactive console, account creation and analytics on own usage..

API Management was launched on December 2018 and the consumption plan (which I plan to use) has been recently released (it was in preview) by the end of May 2019. the announcement clearly says that it is specifically meant for microservices.

Read more on the official Microsoft documentation on API Management or just get the whitepaper.


Next..

And that’s it for today, on our next entry we will create and verify our first REST api in C# with Azure Functions.

Happy coding!

Oculus Quest: The VR headset I’ve waiting for!!


I have been a 3D interface geek since long, with a passion for 2.5D and 3D interfaces design and programming… got one of the first Kinect (for PC) and Kinect 2, and also played with the Oculus SDK1 and 2…

For me, I faced a solid wall with my nausea when entering VR… so tried to focus on the AR with Hololens, so I got tickets and flight for the Build conference when it was announced a possible showcase of HoloLens in Build 2015showcase of HoloLens in Build 2015, which finally happened and I even got invited to a private preview and hands on programming…  but also was lacking to me some key factors.

I have since the Oculus crowdfunding been looking and trying all the different headsets, just to find issues (nausea), lack of responsiveness or not enough resolution, etc.. with the HTC Vive, later versions of the Rift…  until now.

Meet the Oculus Quest

OQ

Short, the Quest is a standalone VR with OLED displays with 1440 x 1600 px per eye, 72Hz refresh, Qualcomm Snapdragon 835 processor with 4Gb Ram and 6 DOF. 571g in total.

I will keep it short, its main features:

  • Simple and easy to put on.
  • 6DOF this is important, see this animation:
    • giphy.6DOFgif.gif
  • Nice resolution, good framerate and IPD adjustment (very nice to have and essential IMHO).
  • Inside out tracking that works Flawlessly (even when moving the hand behind your back – wow!)
  • Accurate and fast tracking, without any perceptible lag or delay –  check how it is able to handle “Beat Saber” at highest difficulty or see it in a video.
  • Secure, you can define a security “play/interaction” area around you and if you approach you receive a haptic and visual feedback. And it works really well.
  • Wireless. No cables. No obstacles. Nothing but freedom.
  • PC Free, it is a standalone device.
  • This last thing comes at a price but it is barely noticeable and the Qualcom.
  • Surprisingly good audio.
  • Some “Mixed Reality” support.

And not a feature but I have severe motion sickness and I can stand it for half an hour to one hour. this is accomplished with all the factors (features and how they have programmed some of the games I’ve played). And after 1h, I am not dizy or have nausea.

Veredict:

Shortly said: A VR Revolution, a sum of good ideas brought together and implemented to work together in a brilliant way. Simply Wow! ..and I mean a bold WOW!!

If you are interested in VR for gaming or for developing, this is it. It is easy to setup, no wires, no expensive PC, it is FAST and accurate, the visuals are really good and also it is fairly easy to start programming with it.

Also, the Inside-out tracking makes it , apart from easier to setup, far more cheaper than earlier VR models where you needed a couple of sensors “lighthouses”.

For me and my opinion, the Oculus Quest is cost-efficiency speaking is the best VR headset of the market. It does the work, with good resolution, refresh rate, without some of the major showstoppers of the recent past (needing a PC and the setup).

To my opinion, it makes VR easy and mainstream. I guess that’s the reason why it has run out of stock in many suppliers and has sold $5 million in content in the first two weeks… or the Superhot sales are 300% higher for the OQ than they were for the original 2016 Rift Launch, so it is an estimation on how the Quest is performing in rellation to the original Rift.

Note that if you are interested, you’d rather act quickly, it is out of stock in many places (US in as short period as a week) and I got mine quickly due that I got the 128GB version… and it is estimated that 2019 will see around 1M sales


Development:

Development for the OQ is great, easy to set up and dive in. It simply does work.

I have on the past two weeks unrusted my Unity skills and I am playing now in learning how to use the “Oculus Integration” tools and integrating the VR with some service I am setting up in the cloud with Azure, to interact with it in brilliant 3D.

And so far, the experience is brilliant and I am having a lot of fun 🙂

only hint I can give is to invest in learning how to apply object pooling as resources are limited, but that is common sense though.

for more information, go to developer.oculus.com 😉


Future:

OQ, Oculus Quest supports Mixed reality so it has a mode that you can locate the controllers with a generated view of your surroundings, with some other minor applications.

BUT and is a big BUT, Oculus is actively working on mixed reality scenarios as well as collaborative interaction, as shown on the following video from the recent “Oculus Connect”:

And..

Also interesting to see how Oculus Insights technology works:

Note: Insight was earlier referred as “project Santa Cruz”, which Oculus has been working in since 2016…

So, when is “Oasis” coming? 😉

And… I have a feeling that the upcoming “Oculus Connect 6” in September 25-26 will be worth watching…


Implementing a Strategy to “rule them all…”

The Strategy pattern

The Strategy pattern is one of the OOP design patterns which I like the most..

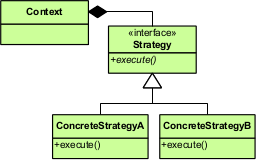
According to wikipedia, “the strategy pattern (also known as the policy pattern) is a behavioral software design pattern that enables selecting an algorithm at runtime.” – source

This UML diagram showcases it Pretty well:

Why I like it?

I believe there are several reasons that make this design pattern one of the most useful ones around..

  • Improves the KISS (Keep It Simple and Standard) principle on the code.
  • LSP – The “Strategies” are interchangeable, can be substituted by each others. This is a clear aplication of the L in SOLID, the Liskov Substitution Principle or LSP: “Objects in a program should be replaceable with instances of their subtypes without altering the correctness of that program.” – Source
  • Open-Closed – The Strategy implementation through an interface is a clear application of the “Open-Closed Principle: “software entities (classes, modules, functions, etc.) should be open for extension, but closed for modification”. In this case we can extend it by writing a class that extends the behavior but we cannot modify the interface. Even more, if we implement the Strategy using a Plugin implementation we do not even need to modify its source code. It’s a very clean implementation. It also helps into Decoupling the code and responsibilities. – Source
  • SRP : We can strongly affirm also say that the Strategy promotes the Single Responsibility Principle as each Strategy implementation should be implemented in a single class.
  • DI: And also, the Dependency Inversion Principle: “One should “depend upon abstractions, [not] concretions.”  – Source. This is so as the Strategies depend on abstractions, an interface which defines the strategy.


We can easily implement the Strategy pattern with Dependency Injection but this makes that the code of the Strategy to be on the same assembly or executable and thus, coupled. Due to this, I consider this as a sub-optimal implementation which does not fulfill the Open-Closed principle at 100% if we consider the main Executable as a “Software Entity”.

Even more, if we are in a highly regulated Environment, this means that we can add functionality without altering “the main software” which might be subject to a regulated process like FDA-approval, in case of a medical system… that means several months of documentation, testing and waiting for FDA to sign everyhting. 

Do you like it already? Wait – there are more Benefits!

In my previous work, at RUF Telematik, I proposed the application of this pattern with a plugin system as part of the Technical Product Roadmap. Basically to decouple the code which interfaces a concrete hardware (type of HW, manufacturer, version…) So the main software would not need to know how to talk with a camera, monitor or communication device in the train System. The responsibility is delegated to a .dll plugin that knows how to do that work and we can dynamically add These Features without altering the main software.

In addition to the software architecture benefits and the code quality, we have some more benefits:

  • We can parallelize the development of the Hardware Manager dlls to different developers who can test them separately.
  • We can separate the release and test workflows and accelerate the development time.
  • We do not need to test the main software every time we add support for a new device or version of a device firmware..
  • We do not need to revalidate through industry standards the full software over and over again (usually with an substantial cost of time and money)

In a train we could categorize the different hardware on it on hte following four categories:

  • TFT screens
  • LCD Screens
  • RCOM Communication devices
  • Camera devices

Each one has different Vendors, models and version numbers so a bit more complex implementation should be needed but this is an example so we do not Need to build “the real Thing”.

So we could implement an interface like ITrainInstrumentManager that supported methods like:

  • Connect
  • Getversion
  • Update
  • Check
  • ExecuteTests
  • UpdateCredentials
  • and so on…


And then implement a Strategy that fulfills this interface for every Type of Equipment, for every brand/vendor and for every model and version…

With the added Benefit that I can parallelize this work and get several persons to work in different Strategies, one for each new device. This would enable to add support for new hardware devices in no time at all.

And they could be tested separately, with the warranty that if the tests do work, the main tool would work as well.

Without altering or releasing the tool, just adding the plugins in the corresponding folder or loading them dynamically from an online service or location. (if we implement the strategy using the plugin technique, of course)

This presentation showcases some of the points mentioned above, if you are still curious.


Implementation of the Strategy Pattern

One of the best implementations I have ever been part of is when I worked along 2011 and 2012 at Parlam Software where a plug-in architecture was designed and implemented by my now friend Xavier Casals. Then he was my customer and CTO of Parlam (and still is).

<Commercial mode>

If you are in Need of translations, do check their solution. Basically it is a full fledged TMS (Translation Management System) which automates your language translation process. More on this here and here.

</Commercial mode>

This Plugin system enabled adding dynamically Data convertors to third party systems, like different CMS systems as “SDL Tridion”, to where his service connects and works with, so basically he can deliver an interface to anybody that wants to interface with its system and enables an easy implementation as well as testing and deployment. Once the DLL is tested and verified, can be signed for security reasons and added to a folder where it is magically loaded and we get the perfect implementation of Open Closed Principle…

“software entities… should be open for extension, but closed for modification”

I know it is a lot to say but let’s get it done and you tell me after 😉


Structure

We will create a .NET standard solution which will have implement 3 Projects:

  • StrategyInterface –> A .NET Core Class Library that will hold the Strategy interface, two custom attributes and a custom exception for managing the plugin. This is the basic contract that we will share between the main application that will use the plugin(s) and the plugins themselves.
  • Plugins –> This is a project with a simple class that implements the Interface on the StrategyInterface Project/Assembly. I will use the two custom Attributes to add a name and a description so I can programatically go through them with Reflection before creating an instance, which is convenient if I want to avoid creating excessive objects. Note that this Project will have different implementations, in our case I created 4: CAM, LED, RCOM and TFT. Each one will create a DLL in a concrete directory, “D:\Jola\Plugins”.
  • StrategyPatternDoneRight –> feel free to discuss with me on the name, comments are open to all ;). This is the main customer/user of the Plugins that implement the Strategy and will load the plugins that match the interface from a concrete location of the filesystem. At the moment I did not put too much logic but just to load all the matching assemblies and execute a simple method which all the plugins provide.

The solution looks like:

Strategy01 structure

StrategyInterface project

The most important here is the interface that defines the Strategy:

Strategy02 interface

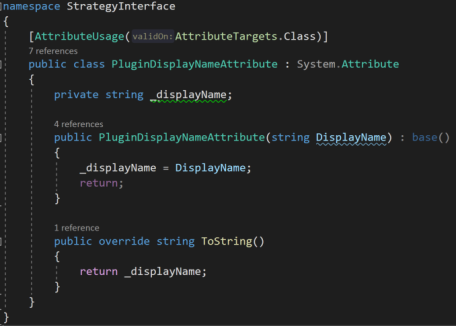
There we will create the custom Attributes, one for Name and another for Description:

Strategy03 cust attrib name

Plugin project(s)

I created a Plugins Folder to contain them all, then created .NET Standard assemblies and added a reference to the StrategyInterface Project.

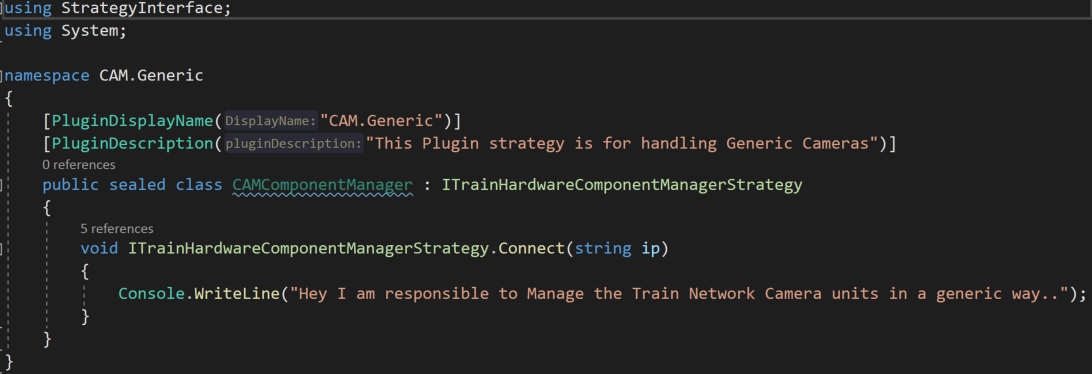
Lets say that we create the CAM.Generic Project to implement support for the Train Network Cameras… there we add a class which implements the Strategy Interface and we add the two custom Attributes to it:

Strategy04 Plugin Strategy Implementation

Obviously this is a simplification but here we would put all the hardware dependant code for handling complex network operations with the camera…

All the Plugin Projects are customized to have the same Build Output Path, to avoid doing Manual work:

Strategy05 Plugin Build properties

Just be Aware that the output path that you use must exist and be the same for all Plugins.

Main Application

So, all we have left is to implement the mechanism to recover the assemblies at a concrete filesystem path and load them dynamically into our current execution process. We will do this using Reflection.

I am creating a wrapper class for exposing the strategies implemented by our plugin assemblies.

This class is named StrategyPluginContainer and will expose the two custom Attributes and an instance of the Plugin (really it is an instance of the class that implements the Strategy Interface).

The two key reflection techniques used here are:

  1. Activator.CreateInstance(Type) – This creates an instance of the specified Type using the default constructor. Note this is not reflection but comes directly from System Namespace.
  2. Type.GetCustomAttributes(Attribute type, inherit) – this obtains from a type the value of a custom attribute.

Note: green is due to style suggestions from my VS installation to what I do not agree if I want clarity. Expression bodied properties or using ?? are good, reduce space but if somebody is not used to this Syntax readability and understandability are reduced..

Strategy06 Plugin Wrapper

Now we can implement the StrategyPluginLoader. This class responsability is to Keep a list of the Plugins that implement the Strategy and it does so by loading them from the Filesystem (could get them from a web service or other mean).

Basically it has a List of StrategyPluginContainer which we just created, exposed through a property.

And populates it by getting all the DLLs from a specific hard disk Folder and loading them with Reflection’s Assembly.LoadFrom(filename).

then we get the types contained on this Assembly and iterate through them to match them against the Strategy Interface. I also check that the two custom Attributes are supported and if everything matches, I create a StrategyPluginContainer instance of this concrete type.

As a final check, I verify if the Plugin is already on the plugin list for not repeating and if is existing I update it in a proper way.

Strategy07 Plugin loader

Last but not least, I use all this through a nice console application, I create the StrategyPluginLoader, I execute the command to load all the plugins and iterate through them invoking the only command in the interface which is implemented in separate, decupled assemblies and loaded dynamically at runtime, without no Knowledge or coupling of any Kind in the main application.

Strategy08 bringing it together

The full code can be found in GitHub here.


Happy coding!


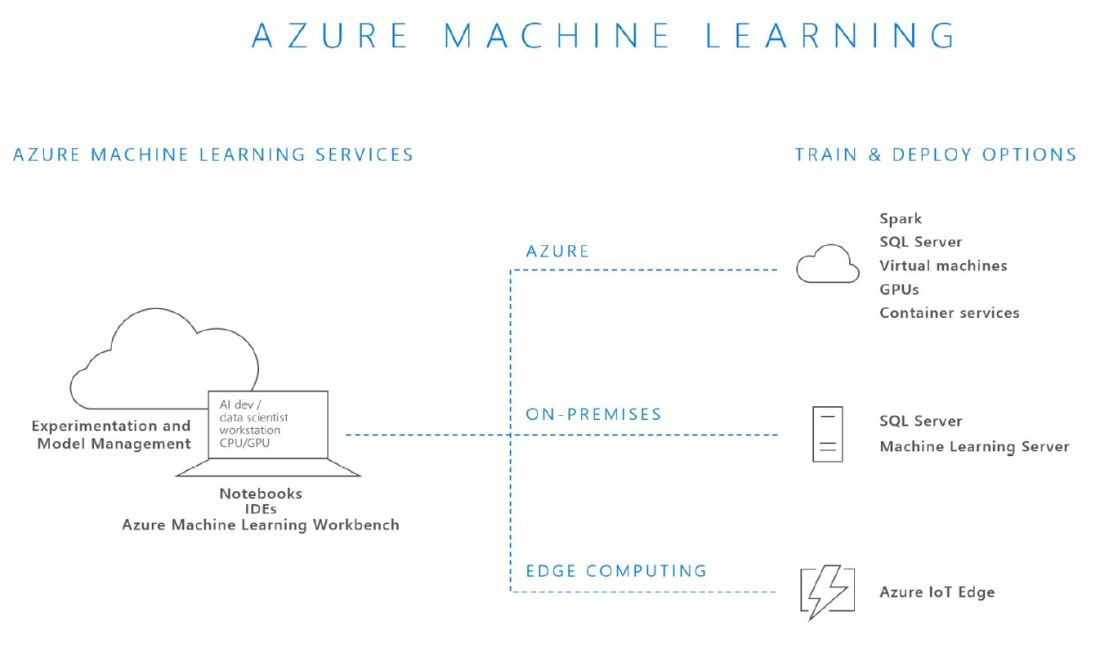
Roadmap towards Microsoft Azure…

Sometime ago, about 1 and a half month I decided to focus in Microsoft Azure Technology and acquire expertise on it…

This is a bit what I have decided to do and how I am doing it.

To say, that I do not like taking chances and usually I overprepare… which is convenient given how TRICKY some of this exams are (at least to me..).

This is the current Exam & Certification roadmap:

Azure_Certifications_04_2019

I disagree a bit on the Architecture Path, the green one on the Picture, towards getting the “Azure Solutions Architect”. Even you should be able to “paint boxes and connect them”, to me a Software Architect is somebody that also knows very well what is inside of These boxes and how they do work.

So for me the Roadmap towards the Azure Solutions Architect has the AZ-203 before the AZ-300.

So, in short, my initial roadmap is:

  1. Get AZ-900 (Update: got it!).
  2. Get AZ-203.
  3. Get AZ-300.
  4. Get AZ-301.

I’d like to have some solid foundations so I focus on a good understanding of the basis so to me, AZ-900 is a must have. There are simply too many “Things” (services, types of services, concepts…) laying around… So having a clear ground basis is a must.

For the AZ-900 I have done:

(now I am pending to have some time hopefully this week to prepare and execute the exam which you can do online through here:

Update: The exam is done and passed, will post shortly some of my comments and thoughts on it..

For the AZ-203 I am halfway preparing and have done/plan to do the following:

  • A very nice course from Scott Duffy at Udemy here: https://www.udemy.com/70532-azure/ (done, as well as some of the recommended HOLs)
  • The Pluralsight Paths
    • Microsoft Azure for Developers” , 34h. (in Progress)
    • To highlight that their paths have a “role IQ”, an in portal exam system that helps to measure your Level and where to focus on.  This is what I got when started, just after Scott Duffy training and some “hands on”Azure dev IQ Pluralsight
    • Developing Solutions for Microsoft Azure (AZ-203)“. And yes, this totals to 59hours but probably it will be really worth watching.  (not started yet)
  • The official HOL (Hands On Lab) for AZ-203 from Microsoft itself! (recommended by Scott Duffy)
  • Support from some of the Microsoft Learn resources, but if you filter by azure developer there are way too many…   I found that this link helped me greatly to focus. here you can see the following picture-recommendation for learning roadmap:AZ-203 roadmap
  • Basically, in Microsoft Learn all the following learning paths. But I plan to do them just as a support if I consider I am not confident on the topic.
  • I am setting up some projects of my own to put some things together so I can glue them in a way that makes sense, but this has some work implications and thus, cannot share in full detail.  One of them is implementing a full REST API with Azure Functions and expose it through Azure API Management, to finally consume it from an Azure App (a web app).  Is still have decided if the data will be stored in a Cosmos DB or SQL Azure database… but for sure it will have AD authentication.
  • And, of course, some exam preparation to get hands on feeling and get to know some of the tricks and traps you might face 😉
  • If you have any tip or recommendation, just shoot in the comments or contact me directly, would be greatly appreciated. I know that some people just take the Scott course, some exam practice and get it but I want some more hands on experience on me before moving forward.


For the “Azure Solutions Architect” certification, I would like to have some real experience and practice, but for now I plan to do:


And that’s it! Any comment or tip would be very welcome 🙂


Quine… er, uh.. what’s that?

That is what I said yesterday to one of my Interviewers 😉

Yesterday I had a damn good interview, four hours of what became an interesting technical conversation on mostly coding and Software architecture related topics, with some interesting challenges which I will not disclose.

But I had fun! and at the end of it, the not anymore interviewer but future colleague asked me if I knew what was a Quine… to what I had no clue so I asked.

Basically is a program that produces a copy of its own source code as its output. Without any other purpose. Apart from the “AHA” moment when you understand what is happening 😉

A simple example, create a console application and paste the following code:

namespace WelcomeTo
{
    class Program
    {
        static void Main()
        {
            string s = @"using System;
namespace WelcomeTo{{
class Zühlke{{static void Main()
{{
string s=@{0}{1}{0};
Console.Write(s,'{0}',s);
Console.ReadLine();
}}}}}}";
            Console.Write(s, '"', s);
            Console.ReadLine();
        }
    }
}

Once we execute it, we get the following result :

quineoutput

Which is basically the same code which generated it.

So, now is your turn to try to figure out why.

Hint: There is a very easy to catch eastern egg on it…

Thanks To Jonathan Ziller for pointing me to it.


How-to implement a SOLID Watchdog

close up photo of dog wearing sunglasses
Photo by Ilargian Faus on Pexels.com

We all have components in our software or network that we want to monitor how are they behaving.

This is usually called a watchdog component and I was not that happy with some of the implementations and decided to put a bit of my private time on it, as a bit of “technical challenge”.


Quick introduction

Recently in my Company we had to implement a watchdog to monitor hardware resources and their availability.
Reasoning is that network connectivity is “eventual” and we must react to these states (basically we are talking about trains, its wagons and accessing them from central so we have these things that happen like separating and uniting wagons, tunnels and our wonderful networks that work so flawlessly when we need them the most, right?)
But, this might be migrated to another scenarios, like watching out for micro services, identify if they are behaving properly and, if not, restart them if necessary…

I decided to put some fun tech time to get some of the best features I could find on the net and from my colleagues and create something close to the best solution possible to a watchdog system that could notify “some other system” when disconnection and/or re-connection events happen 😉
Yes, I wanted this to be efficient but also as decoupled as possible.

Maybe too much for a single blog post? Maybe you are correct, but come with me till the end of the post to see if I managed to get there…

Let’s get to it!!


An early beginning..

To monitor networking resources we will use a Ping, for this we must use its containing .NET namespace, System.Net.NetworkInformation.

Ping sends an ICMP (Internet Control Message Protocol) echo message to the computer with the specified IP address. We have also a parameter for a timeout in milliseconds. But, we have to note that if this number is very small, the ping can be anyway received even if the timeout ms have elapsed. So it seems a bit “unimportant”.

After we can use its basic construct so let’s try to ping ourselves..

int timeout = 10;
Ping p = new Ping();
PingReply rep = p.Send("192.168.178.1", timeout);
if (rep.Status == IPStatus.Success)
  {
       Console.WriteLine("It's alive!");
       Console.ReadLine();
  }

Not very exciting yet, but it Works (or it should… as we are pinging ourselves… unless we have a very restrictive firewall..)


Now some more timers.. and pinging Asynchronously…

Upon looking for references, Tim Cooker response to a particular post looked to me as the best implementation so far) Ref: https://stackoverflow.com/questions/4042789/how-to-get-ip-of-all-hosts-in-lan/4042887#4042887

He is using a countdownEvent primitive to synchronise the pingAsync() responses which I particularly liked…

To takeaway is the synchronisation of the Ping.SendAsync() calls is a bit confusing

If you  bring it to Windows Forms, you will find some issues due to the nature of Ping.SendAsync()

Read more on it here: https://stackoverflow.com/questions/7766953/asynchronous-code-that-works-in-console-but-not-in-windows-forms/7767632#7767632

Basically the Ping tries to raise the PingCompleted on the same thread that SendAsync() was invoked on. But, as we blocked the thread with the countdownEvent, the Ping cannot complete as the thread is blocked. Welcome Deadlock (I am speaking in the case of executing this code on Winforms).

In a console application it Works due that it does not have a synchronisation provider and the PingComplete() is raised in a thread pool thread.

Solution would be to run the code on a worker thread, but this will result that the PingComplete() will also be called on that thread..

Another Pearl on “Ping usage”

I found another article which is a must read: http://www.justinmklam.com/posts/2018/02/ping-sweeper/

Here it clarifies what we saw regarding using the Ping.SendAsync(). Basically we have another command on this .NET namespace with an extremely similar name, SendPingAsync(). At a simple view we would think it is redundant and does not sound right… so, what are they doing and what are they different?

According to MSDN

  • SendAsync method Asynchronously attempts to send an Internet Control Message Protocol (ICMP) echo message to a computer, and receive a corresponding ICMP echo reply message from that computer.
  • SendPingAsync Sends an Internet Control Message Protocol (ICMP) echo message to a computer, and receives a corresponding ICMP echo reply message from that computer as an asynchronous operation.

So translating a bit, SendAsync sends the ICMP asynchronously but the reception is not asynchronous. SendPingAsync ensures that the reception is asynchronous.

So, we should use SendPingAsync().


Links to the referenced MSDN sources:


Putting it all together with our “ol’ friend”, the “Timer”..

Initial implementations I have seen for a watchdog were usually following the pattern that a timer is created that will trigger a “watch this resource” task on a given regularity.

This Tick of the timer will trigger the Ping process we have seen.

I got two very good tips on this implementation which are:

  • Once the timer Tick is called, we pause the timer it by setting the timer period to infinite. We resume it only when the tasks to be performed, in this case a single ping, are done. This will ensure no overlap happens and we have no escalation on the number of threads.
  • Set the timer to a random time, to ensure a bit of variability on the execution to help on distributing the load, ie., the pings do not happen at the same time.


Some code:

using System;
using System.Net.NetworkInformation;
using System.Threading;

namespace cappPingWithTimer
{
    class Program
    {
        static Random rnd = new Random();
        static int min_period = 30000; // in ms
        static int max_period = 50000;
        static Timer t;
        static string ipToPing = "192.168.178.1";
        static void Main(string[] args)
        {
            Console.WriteLine("About to set a timer for the ping... press enter to execute >.<");
            Console.ReadLine();
            Console.WriteLine("Creating new timer and executing it right away...");
            t = new Timer(new TimerCallback(timerTick), null, 0, 0);       
            Console.WriteLine("press Enter to stop execution!");
            Console.ReadLine();
        }

        private static void timerTick(object state)
        {
            Console.WriteLine("Timer created, first tick here");
            t.Change(Timeout.Infinite, Timeout.Infinite); // this will pause the timer
            Ping p = new Ping();
            p.PingCompleted += new PingCompletedEventHandler(p_PingCompleted);
            Console.WriteLine("Sending the ping inside the timer tick...");
            p.SendAsync(ipToPing, 500, ipToPing);
        }

        private static void p_PingCompleted(object sender, PingCompletedEventArgs e)
        {
            string ip = (string)e.UserState;
            if (e.Reply != null && e.Reply.Status == IPStatus.Success)
            {
                Console.WriteLine("{0} is up: ({1} ms)", ip, e.Reply.RoundtripTime);
            }
            else if (e.Reply == null) //if the IP address is incorrectly specified, the reply object can be null, so it needs to be handled for the code to be resilient..
            {
                Console.WriteLine("Pinging {0} failed. (Null Reply object?)", ip);
            }
            else
            {
                Console.WriteLine("response: {0}", e.Reply.Status.ToString());
            }

            int TimerPeriod = getTimeToWait();
            Console.WriteLine(String.Format("rescheduling the timer to execute in... {0}", TimerPeriod));
            t.Change(TimerPeriod, TimerPeriod); // this will resume the timer
        }

        static int getTimeToWait()
        {
            return rnd.Next(min_period, max_period);
        }
    }
}


Main issues here is that this technique is meant to trigger a timer “watchdog” for every component/resource we want to monitor, so architecturally wise it might look like an uncontrolled mess that can create a lot of threads..


But this is a Task driven world… since .NET 4.5 at least..

So, now we know how to implement a truly asynchronous ping with SendPingAsync(),  which we can call recurrently with a Timer object instance..

But as of this writing we have better tools in .NET for asynchronous/parallel work.. and it is not Backgroundworker (which would be if we needed to deploy a pre- .NET 4.5 solution)…

…but using Async/Await Tasks, which we have since .NET 4.5 (aka, TAP).

Basically it would become a matter of creating a task for every Ping operation and wait for them to complete in parallel.

And if inside a watchdog, to call it every certain time.. maybe not with Timer… if we have .NET 4.5 we can try to avoid creating extra threads if we can, right?


And now, discussing our Watchdog implementation…

Wouldn’t be ideal to have a decoupled watchdog system that we are able to plug and play anywhere in a SOLID way?

Basically I try to think in simple patterns and provide simple solutions so the first that comes to my mind is implementing the watchdog using an observer pattern that we can register for getting updates on the “connectivity” status of different network resources.

To me only two simple connectivity status matter:

  • Connected
  • Disconnected

So the code can react on this…

We could add “reconnecting” but this would mean that the watchdog knows the implementation of whoever uses it, but we want to decouple (abstract) so this is something that the “user” app should have to manage by itself. So no.

To our watchdog if we get a IP response back, we are connected. And the Consumer app react on this two basic facts. Simple, right?

Another thing we would need is a way to add the elements to be watched by the Watchdog.

For now, I believe this list should have this information for each of the elements to watch over:

  • IP
  • ConnectionStatus
  • LastPingResponse (why not keep the latest ping reply)
  • ElapsedFromLastConnected (from the previous time we had a connection)
  • TotalPings
  • TotalPingsSuccessful


Timer or no Timer? As a timer will create a thread 100% we have also a way to have this done by TAP, and we can make the process cancellable, so the decision is easy.

And we put the Observer pattern in the mix too right?

observer.jpg

So, to benefit our “Network” Watchdog subscribers (Observers) we will provide means for:

  • Attach or Register
  • Detach or Unregister
  • Be Notified

Also, we have the fundamental question on how do we want to do this… we can let them subscribe to the full list of resources, if they are centralised, it makes sense or, otherwise, we might have them to be observed by a concrete end component.. and on this case it might only be interested in a single resource.. so… what to do?

Basically I implemented the Subject Interface to both; the resource list and the concrete resource. Then we have a flexible design that fits all functions and fits with proper software quality standards.


The code is simple, a simple Project implementing a .NET Core component with a simple console application that showcases its usage:

img 01

Five interfaces are declared, one for the Network Watchdog so we can:

  1. Add resources to be watched
  2. Configure the Watchdog
  3. Start it
  4. Stop it

Yes,  future one would be to remove resources, but did not think that fully yet. But will probably get that in short.


The other four are the interfaces for the Observer pattern, one for the Subject and other for the Observer. I am more familiar with the concept of having a Publisher and a Subscriber and these names sound better and feel more meaningful to me tan Subject/Observer so I use them instead.

One pair is meant for the Network Watchdog, for all the resources and another one is meant for a concrete Resource itself.

img 02 - interfaces

Then we have an enum with the connectivity state, which holds Connected and Disconnected.

Then the next thing to watch is the implementation of ResourceConnection:

using ConnWatchDog.Interfaces;
using System;
using System.Collections.Generic;
using System.Diagnostics;
using System.Net.NetworkInformation;
using System.Threading.Tasks;

namespace ConnWatchDog
{
    public class ResourceConnection : IResourcePublisher
    {
        public string IP { get; private set; }
        public ConnectivityState ConnectionState { get; private set; }
        public IPStatus LastStatus { get; private set; } // Technically it can be obtained from the PingReply..
        public PingReply LastPingReply { get; private set; }
        public TimeSpan LastConnectionTime { get; private set; }
        public long TotalPings { get; set; }
        public long TotalSuccessfulPings { get; set; }
        private Stopwatch stopWatch = new Stopwatch();
        public bool StateChanged { get; private set; }

        // Member for Subscriber management
        List<IResourceSubscriber> ListOfSubscribers;

        public ResourceConnection(string ip)
        {
            ConnectionState = ConnectivityState.Disconnected; // first we asume its disconnection until we prove opposite.
            LastStatus = IPStatus.Unknown;
            TotalPings = 0;
            TotalSuccessfulPings = 0;
            stopWatch.Start();
            IP = ip;
            StateChanged = false;

            ListOfSubscribers = new List<IResourceSubscriber>();
        }

        public void AddPingResult(PingReply pr)
        {
            StateChanged = false;
            TotalPings++;
            LastPingReply = pr;
            LastStatus = pr.Status;

            if (pr.Status == IPStatus.Success)
            {
                stopWatch.Stop();
                LastConnectionTime = stopWatch.Elapsed;
                TotalSuccessfulPings++;
                stopWatch.Restart();

                if (ConnectionState == ConnectivityState.Disconnected)
                    StateChanged = true;
                ConnectionState = ConnectivityState.Connected;
            }
            else // no success..
            {
                if (ConnectionState == ConnectivityState.Connected)
                    StateChanged = true;
                ConnectionState = ConnectivityState.Disconnected; 
            }

            // We trigger the observer event so everybody subscribed gets notified
            if (StateChanged)
            {
                NotifySubscribers();
            }
        }

        /// <summary>
        ///  Interface implemenation for Observer pattern (IPublisher)
        /// </summary>
        public void RegisterSubscriber(IResourceSubscriber subscriber)
        {
            ListOfSubscribers.Add(subscriber);
        }
        public void RemoveSubscriber(IResourceSubscriber subscriber)
        {
            ListOfSubscribers.Remove(subscriber);
        }
        public void NotifySubscribers()
        {
            Parallel.ForEach(ListOfSubscribers, subscriber => {
                subscriber.Update(this);
            });
        }
    }
}


This is a simple beast that implements the Observer pattern for if any other component wants to watch over a concrete resource.


The NetworkWatchdog code:

using ConnWatchDog.Interfaces;
using System;
using System.Collections.Generic;
using System.Linq;
using System.Net.NetworkInformation;
using System.Threading;
using System.Threading.Tasks;

namespace ConnWatchDog
{
    public class NetworkWatchdogService : IWatchdogPublisher, INetworkWatchdog
    {
        List<ResourceConnection> ListOfConnectionsWatched;
        List<IWatchdogSubscriber> ListOfSubscribers;
        int RefreshTime = 0;
        int PingTimeout = 0;
        public CancellationToken cancellationToken { get; set; }
        bool NotifyOnlyWhenChanges = false;
        bool IsConfigured = false;

        public NetworkWatchdogService()
        {
            ListOfConnectionsWatched = new List<ResourceConnection>();
            ListOfSubscribers = new List<IWatchdogSubscriber>();
        }

        /// <summary>
        ///  Interface implemenation for Observer pattern (IPublisher)
        /// </summary>
        public void RegisterSubscriber(IWatchdogSubscriber subscriber)
        {
            ListOfSubscribers.Add(subscriber);
        }
        public void RemoveSubscriber(IWatchdogSubscriber subscriber)
        {
            ListOfSubscribers.Remove(subscriber);
        }
        public void NotifySubscribers()
        {
            Parallel.ForEach(ListOfSubscribers, subscriber => {
                subscriber.Update(ListOfConnectionsWatched);
            });
        }

        /// <summary>
        ///  Interfaces for the Network Watchdog
        /// </summary>
        
        public void AddResourceToWatch(string IP)
        {
            ResourceConnection rc = new ResourceConnection(IP);
            ListOfConnectionsWatched.Add(rc);
        }

        public void ConfigureWatchdog(int RefreshTime = 30000, int PingTimeout = 500, bool notifyOnlyWhenChanges = true)
        {
            this.RefreshTime = RefreshTime;
            this.PingTimeout = PingTimeout;
            this.NotifyOnlyWhenChanges = notifyOnlyWhenChanges;
            cancellationToken = new CancellationToken();
            IsConfigured = true;
        }

        public void Start()
        {
            StartWatchdogService();
        }

        public void Stop()
        {
            cancellationToken = new CancellationToken(true);
        }

        private async void StartWatchdogService()
        {
            var tasks = new List<Task>();

            if (IsConfigured) {
                while (!cancellationToken.IsCancellationRequested)
                {
                    foreach (var resConn in ListOfConnectionsWatched)
                    {
                        Ping p = new Ping();
                        var t = PingAndUpdateAsync(p, resConn.IP, PingTimeout);
                        tasks.Add(t);
                    }

                    if (this.NotifyOnlyWhenChanges)
                    {
                        await Task.WhenAll(tasks).ContinueWith(t =>
                        {
                        // now we can send the notification ... if any resources has changed its state from connected <==> disconnected 
                        if (ListOfConnectionsWatched.Any(res => res.StateChanged == true))
                            {
                                NotifySubscribers();
                            }
                        });
                    }
                    else NotifySubscribers();

                    // After all resources are monitored, we delay until the next planned execution.
                    await Task.Delay(RefreshTime).ConfigureAwait(false);
                }
            }
            else
            {
                throw new Exception("Cannot start Watchdog not configured");
            }
        }

        private async Task PingAndUpdateAsync(Ping ping, string ip, int timeout)
        {
            var reply = await ping.SendPingAsync(ip, timeout);
            var res = ListOfConnectionsWatched.First(item => item.IP == ip);
            res.AddPingResult(reply);
        }
    }
}

Yes, now Reading it again the ListOfConnectionsWatched could be named differently like ListOfNetworkResourcesWatched… so keeping it in mind so I can update that in the Git repo later on.

As a detail, while writing the demo, I thought that in some cases we want all the updates to be notified, so we have a permanent heartbeat that we can bind to a UI. NotifyOnlyWhenChanges does this, otherwise we only send notifications if there has been a change in the connected/disconnected state.


And.. no timer is used, so at the end we are using:

await Task.Delay(RefreshTime).ConfigureAwait(false);

Which does what we want without extra threading.


The last piece of code is an example application which uses the presented software component:

This is an example on how to use the presented software component, my “use case” is “I want a ping sweep over my local home network to see who is responding or not”.

The code creates several resources to be watched and setup the class as a subscriber to the receive connection status update.

For this we have to implement the interface IWatchdogSubscriber and implement the update method.

    public class AsyncPinger : IWatchdogSubscriber
    {
        private string BaseIP = "192.168.178.";
        private int StartIP = 1;
        private int StopIP = 255;
        private string ip;
        private int timeout = 1000;
        private int heartbeat = 10000;
        private NetworkWatchdogService nws;

        public AsyncPinger()
        {
            nws = new NetworkWatchdogService();
            nws.ConfigureWatchdog(heartbeat, timeout, false);
        }

        public async void RunPingSweep_Async()
        {           
            var tasks = new List<Task>();

            for (int i = StartIP; i < StopIP; i++)
            {
                ip = BaseIP + i.ToString();
                nws.AddResourceToWatch(ip);
            }

            nws.RegisterSubscriber(this);
            var cts = new CancellationTokenSource();
            cts.CancelAfter(60000);
            nws.cancellationToken = cts.Token;
            nws.Start();
        }

        public void Update(List<ResourceConnection> data)
        {
            Console.WriteLine("Update from the Network watcher!");
            foreach (var res in data)
            {
                if (res.ConnectionState == ConnectivityState.Connected)
                {
                    Console.WriteLine("Received from " + res.IP + " total pings: " + res.TotalPings.ToString() + " successful pings: " + res.TotalSuccessfulPings.ToString());
                }
            }
            Console.WriteLine("End of Update ");
        }
    }

Note that the CancellationTokenSource is there for convenience, this will stop the Watchdog after 60 seconds, but we could bound that to the UI or any other logic.

From my main clause, I have only two lines of code needed:

var ap = new AsyncPinger();           
ap.RunPingSweep_Async();

I am happy with the results and time dedicated and I am already thinking on how to potentially extend  such a system like:

  • Extending to another scenarios like monitoring Services
  • Extending to provide custom actions (ping, Service monitor, application monitor, etc…) but this would require as well custom data too.
  • Extending to enable the watchdog to do simple actions like a “keep alive” or in case of a Service issue, to be able on its own to try to solve the issue “stop and restart” protocols…
  • Improve this above points with implementing the Strategy pattern “properly”.


So what do you think? What would you change, add or remove from the proposed solution to make it better?


Happy coding!

The full code with the sample usage can be found here: https://github.com/joslat/NetworkWatchDog


NDepend, a review

Shortly ago I got my hands on NDepend, thanks to Patrick Smacchia, lead developer for NDepend, a static code analyzer made for performing static analysis on .NET code

On this blog post, I am doing to explain a bit what is it and what it does

What is NDepend?

As mentioned, a static analysis code for .NET & .NET Core. Static means that the code analysis is performed on the code while it is not being executed.

Usually static code analysis is performed to ensure that the code adheres to some guidelines or metrics, like the number of warnings, certain errors..

Probably, if you work professionally with .NET you have worked with static analyzers from visual studio itself, being the most common Fxcop, Stylecop or the more advanced SonarQube.

That said, the fact is that these code analyzers do not compete with NDepend as they are fundamentally different. In fact, they complement each other.

What is different?

Basically, the rule set implemented by NDepend is essentially different from the other static analyzers, like SonarQube or other Roslyn Analyzers. These are good to analyze what happens in a method, code, syntax and the code flow… whilst NDepend is good at seeings things from a wider, higher-level perspective. It is really focused on analyzing the architecture, OOP structure and implementation, dependencies – where the product name comes from 😉 -, metrics, breaking changes and mutability – and many others too.

The strength of NDepend relies in analyzing software architectures and their components, complexity and interrelation whilst other products strengths are at a different level, focusing more in code modules, being all of them of course excellent products.

NDepend is designed to integrate with some of these products, like SonarQube.

To know more, here

What does it do?

It performs static code analysis on .NET & .NET Core and, upon that, delivers the following information about your code and, importantly, its architecture:

  • Technical Debt Estimation
  • Issue identification
  • Code quality
  • Test Coverage
  • Complexity and diagrams
  • Architecture overview

(Note: it does way more but I’ve shortened to what I think Is important)

And it shows it in a very smart way, let me show you the NDepend Dashboard:

ndepend 01.JPG

Additionally it integrates seamlessly with visual studio, TFS and VSTS. Integrates especially well with the build process, provides the ability to analyze this data over time, comparing builds, test coverage, the build processes.

To know more, here 

Another feature, which is important for communicating to management and reasoning on “passing a milestone” or “fixing the technical debt” (read Technical Debt as the total issues that we leave in the code knowing they are there… but software has to ship, right?). But coming to this, it provides a smart estimation on it.


A quick example

To get some hands on .NET Core I implemented recently a simple service in .NET Core, which I implemented some tests just for fun and also made it asynchronous. Let’s see how it faces the truth! – Just bear in mind it was a just for fun project and time was limited 😉

I’ts quite easy, I followed the steps on the “getting started” video here, installed NDepend, its visual studio plug-in and opened my VS2017, where now appears an NDepend tab.

Let’s open my RomanConverter coding dojo self practice project and click on attach a new NDepend project.

ndepend 02.JPG

The following window appears and we can already click the “play” green button.

ndepend 03.JPG

On the bottom right corner, there is a sphere indicating the status of NDepend. This will start the analysis and the indicator will showcase that it is analyzing.

Once finished, our report will display itself on a browser.

ndepend 03a.JPG

From the Dashboard, click and explore the different information exposed.

A simple click in the Rules Pane, for example, in the violated rules gives us this dashboard:

ndepend 03b.JPG

I find it brilliant, not only the issues are identified but a stacked DataBars are used to showcase the rules with more issues or, with bigger times to fix, as well as having them slightly color identified so understanding which issue(s) are the most critical and deciding which ones to tackle first – or right away – is pretty damn intuitive.

Note to this: I also realized, thanks Patrick for pointing, that clicking on the issues will show them, so what seems like a presentation UI is becoming like a fully interactive dashboard that gets you into action – or to understand the underlying issues better.

There are easily identifiable what our managers would call “low hanging fruit”, easy to fix and saving trouble for later..

Other useful panel is the Queries and Rules explorer which we can open from the circle menu, on the bottom right corner. Or we can use the usual menu: NDepend à Rules à View Explorer Panel.

ndepend 04a.JPG

And it will appear:

ndepend 04.JPG

With this panel, we can explore the rules that the solution has violated, which are grouped into categories like Code Smells, Object Oriented Design, Architecture, Code Coverage, Naming conventions, a predefined “Quality Gates”, Dead Code, and many more… If we click on a rule, we can explore the  C# LINQ Query aka “CQLinq” query that defines it.

This CQLinq attacks a code model dedicated to code quality and can be edited live and also compiled & executed live.

An example of such rule follows:

// <Name>Interfaces must start with an I</Name>
 warnif count > 0 
 Application.Types.Where(t => t.IsInterface && !t.SimpleName.StartsWith("I"))

And it seems damn simple, even to me.. 😉

From here we can quickly access the offensive code and fix it.

Other visualizations that must be explored are the Dependency graph, matrix, and the Metrics view.

All are advanced visualizations which show great insight on our solution and how it is structured. Let’s see them.

Code Metrics View

ndepend 05.JPG

Here we can see that by default we are analyzing our Methods with Lines of Code versus Cyclomatic Complexity. This visualization being a treemap, helps greatly to understand the information.

We can configure the metrics, with a wide selection on level of granularity, size (of the treemap boxes) and color. An especially useful one is code coverage.

An example can be seen next, based on the own Ndepend 😉  source here

TreemapColor.png

Dependency Graph

Here we can see a graph representation, initially on our namespaces which uses LOC as sizing factor for the nodes and the members for the width of the edges connecting them. We can also include the third party assemblies.

ndepend 06.JPG

It is great for getting to know if the interfaces are respected from a Software Architecture viewpoint or, to see if certain assembly is used only where it should be.

I saw no possibility to group several assemblies into one, for example, the explosion of Microsoft.AspNetCore into several assemblies is of no use, I would like to be able to group them into a single Node for example for having the graph more clear. Otherwise this can add noise which can might make other relations I want to visualize harder to detect.. (Update: Patrick Smacchia mentioned that this is on the works – cool!)


The Dependency Matrix

Large solutions would make the previous graph representation a mess, too many namespaces and assemblies. Here we can select namespaces or assemblies and restrict them, drilling down to the elements that we want to dig in, and go to their graph view.

ndepend 07.JPG

There we can select even a method and right click to either see it on a dependency graph view or as a dependency matrix.


What is special about it?

Simply said, its estimation is not only based on source code, but also on the solution level analysis, as mentioned earlier.

Also I mentioned the C# LINQ Queries and it seems to me like a quite flexible approach, everything is interlinked and all the analysis are performed on queries and a lot of the data presented is based on queries apart from the rules: trend, quality gate, searches..

Its visualizations are special, point. Showing the right visualization for the job in a simple, yet efficient, way. Yes, if we are not used to Graphs, Dependency matrixes or tree maps this tool can look intimidating, but don’t be. Once you get used to it, it will become second nature. I used it some years ago to fix a mess and it helped greatly. I did not use it fully though, just for two visualizations.

Other aspect I do really like is that whenever you visualize some information, all relevant information comes along. An example are the Rules! I like the detail that even on the top menu we can see what the current solution is violating.

Or the fact that when I see the rules panel, I see the issues next to the debt and the annual interest and more.

Fundamentally, helps by showing important information where we need it.

Should we use it?

First, to have a visual reference of your project and what is good (or wrong) on it. It can show a lot of things in a very visual way, which can help greatly in:

  1. Knowing the state of our solution
  2. Understanding (the issues, where are they, and the effort it will take to fix them)
  3. Communicating to managers


Concrete features:

  • Enforce Technical Debt measurement in your coding guidelines and processes. This is especially regarding the cost to fix and cost of letting unfixed issues “in”.
  • Understand the entanglement of our software
  • Analyze Software architecture and Code Quality
  • Accurately track the state of our software over time, being able to determine its improvement (or worsening) on its different attributes.


Summarizing – I like it a lot!

It is easy to get lost but it is a rare jewel with an entry barrier that you should push until it’s broken, to see its beauty or, said clearly, its usefulness.

To me its best feature is able to showcase already implemented software architectures in a different, kinesthesic way, with different visualizations tailored to showcase and highlight important aspects of your software.  This is great to see the real state of your code and understand it – and fix it.


References:


Introduction to the Azure Machine Learning Workbench

Following the announcements post published some days ago  here,  we will dig deeper on this new tool, the Workbench. This is also called AML Workbench, which is shorter and this term will be used from now on to refer to Azure Machine Learning Workbench (glad about the acronym as I do not want to type that again :P)


But, what’s the AML Workbench?

It is a desktop application for Windows and MacOS, it has built-in data preparation that learns the data preparation steps as we perform them, which is able take avantage of the best open source frameworks including TensorFlow, Cognitive Toolkit, Spark ML and scikit-learn.

This also means that if you have a GPU that supports AI (read my earlier blog post on the topic here https://joslat.blog/2017/10/15/give-me-power-pegasus-or-the-state-of-hardware-in-ai/ ) you will be benefitting from that power heads-on.

Oh, it has also a command line interface for those who like them 😀


Sounds interesting? Then let’s get started!


Concepts first!

AML – Azure Machine Learning

This is in need to be described at the earliest as it might be a bit confusing. This is a solution proposal from Microsoft that englobes different components and services to provide an integrated end-to-end solution for data science and advanced analytics.

With it we can prepare data, develop experiments and deploy models at cloud scale (read massive scalability here)

AML consists of a few components:

  • AML Workbench – Desktop tool to “do-it-all” from a single location.
  • AML Experimentation Service – I “suppose” this will enable us to validate hypothesis in a protected scenario.
  • AML Model Management Service – I suppose this will enable us to manage our models
  • Microsoft Machine Learning Libraries for Apache Spark (MML Spark Library) – I read Spark/Hadoop integration here, probably to Azure servers
  • Visual Studio Code Tools for AI – I read here R & Python integration with Visual Studio


This picture showcases how AML Workbench fits in the Microsoft AI Ecosystem:

AML intro architec high level.JPG

To say that AML fully integrates with OS (Open Source) initiatives such as scikit-learn, TensorFlow, Microsoft Cognitive Toolkit or Spark ML.

The created experiments can be run in managed environments as Docker containers and clusters running Hadoop with Spark (I am wondering why is Microsoft is only mentioning Spark there if they work together? – Ok! As it was built as an improvement over MapReduce it can also run Stand Alone in the cloud, that’s why!). Also they can use advanced hardware like GPU-enabled VMs in Azure.

AML is built on top of the following technologies:

  • Jupyter Notebooks
  • Apache Spark
  • Docker
  • Kubernetes
  • Python
  • Conda


AML Workbench (yeah, finally!)

Desktop application with a command-line for Windows & MacOS to manage ML solutions through the entire data science life cycle.

  • ETL
  • Model development and experiment management
  • Model Deployment


It provides the following functionalities:

  • Data Preparation that can learn by example (Wow!)
  • Data source abstraction
  • Python SDK for invoking visually constructed data preparation packages (SSIS anyone?)
  • Built-in Jupyter Notebook service and Client UX (like anaconda?)
  • Experiment monitoring and management
  • Role-based access to support sharing and collaboration
  • Automatic project snapshots for each run and version control (trazability on “experiments” at last!) along GIT integration
  • Integration with popular Python IDEs


Let’s install it!

First things first, do you have a computer with windows 10 or macOS Sierra? (I guess you won’t have a Windows Server 2016 at home, do you?) If so proceed.. else go update https://www.microsoft.com/en-us/store/b/windows 😉


Oh, well… before installing we need to set up an ML experimentation account..

Go log-in in the Azure portal here https://portal.azure.com/

Click on the new button (+) on the top left corner of the Azure portal and tzpe “machine learning” and select the “Machine Learning experimentation (preview)”

Azure 01 MLE preview.JPG

Click create and fill in the nice form:

Azure 02 MLE preview.JPG

Be sure to select “DevTest” as the cost-saving Model Management pricing tear, otherwise it will have a cost. Dev Test appears as “0.00”. Otherwise you might forget and have a non-pleasant surprise…

Azure 03 MLE preview.JPG

As I am not that much into playing with azure at a personal level (mostly HOLs and learning) I deleted all my resources, including a DB I created at a HOL that suddenly had a cost… luckily very low… and created all the required elements from the ground up. Resource Group, experimentation account, storage account, workspace, model management account, account name… my recommendation is that you keep that data safe and close to you. As this is all protected by Microsoft’s Azure security.

Oh, and Click “Create” to create all this components in the cloud. We should see a “Deployment in progress..” message which should be over in a couple of minutes, as shown in the picture below.

Azure 04 MLE preview.JPG

Also we should see the details of the resources created, storage, resource group, etc… along some useful tools to download (at last) the AML Workbench.

We can also download it from here https://aka.ms/azureml-wb-msi

And double click it or right click and select “install”.

After the installer loads we should see the gorgeous installer…

Azure 05 MLE preview.JPG

It’s clean, it’s Metro..ups! I meant modern!

As usual, click continue and you will be presented the dependencies and installation path, shown next.

Azure 06 MLE preview.JPG

There I did not like I could not change the installation path… so we can only click the install button… and cross fingers that this does not create any conflict with your Anaconda installation… as this is a clear preview (read here: under your own responsibility)

Oh, I do NOT recommend you to wait for the installation to finish…

…go watch a series or to the gym (as I did in fact) – the installation will take about half an hour to download and install all the required components…


Now AML Workbench (preview) is installed in your computer, congratulations!!

Azure 07 MLE preview.JPG

Note that you can find it at C:\Users\<user>\AppData\Local\AmlWorkbench

Oh, and get used to this icon, I have the feeling we will be visiting it for a while 😉

But let’s continue, we are not yet finished!!


First steps!

So, let’s do something! Baby steps of course..

Start it and log-in to your Azure/Microsoft account. Automatically you should be able to see the recently created workspace in the Azure portal.


Click on the plus sign next to “Projects” panel in the top left or in the text menu, select File and then “New Project…”

We will give our project a name, like “Iris”, then select a directory to save your Azure Machine Learning Projects in your local computer and add a description.

We have to select our workspace, which by default will be the one we just created in the first place.

We will select the template “Classifying Iris” and click on the “Create” button below. This template is a companion sample project for Azure Machine Learning which uses the iris flower dataset.

Azure 07b MLE preview.JPG

Once the project has been created we will see the dashboard of the recently created project.

We can see several sections from our dashboard: the home section of our project, the data sources, notebooks, runs and Files.

On the project dashboard panel we can see a description of our project with instructions on how to set it up and follow the Quick start and tutorials, as well as an execution section.

The Data panel showcases the data sources and the preparations for obtaining them. This is a pretty special section with truly amazing features that can only be found on the AML Workbench, but we will see it on a next post.

It is worth noting that the Notebook panel is basically a Jupyter notebook container, as on the installation there was a custom anaconda installation being made, which also did not seem to tamper with my installation of Anaconda…

We can also open the project in Visual Studio Code or other configured IDE.

If we do not have we can install it now here https://code.visualstudio.com/

On the text menu, select File, then “Configure Project IDE” and input a name and the path for your IDE, which I selected VS Code, as we can see next:

Azure 08 MLE preview.JPG

Once this is installed, we should install Python support for VSCode, so we go to the extensions menu and select one of the Python extensions. In my case I selected the Python 0.7.0 from Don Jayamanne, but this extension seems the most complete.

Azure 09 MLE preview.JPG

Once this is set up we can go to the text menu, click on File, then on “Open Project”, next to it should appear our configured IDE between brackets, “(Visual Studio Code)”. We can see VSCode with the project loaded and we can click on one of the Python source files, for example, iris_sklearn.py. We should see the syntax highlighter at work, intellisense also working, between some other features.

Azure 10 MLE preview.JPG

Now, let’s execute it, we can go to the project dashboard panel and select “local”, then the source file “iris_sklearn.py” and add “0.01” in the arguments and click run.

We could also execute it on the Files panel, select the “iris_sklearn.py”

On the right side of AML Workbench, the Jobs pane should appear and showcase the execution(s) that we have started.

While we are at it, we could try some other executions changing the argument to range from 0.001 to 10.

Azure 11 MLE preview.JPG

What we are doing is executing a logistic regression algorithm which uses the scikit-learn library.

Once the different executions have finished, we could go to the Runs panel. There, select “iris_sklearn.py” on the run list and the run history dashboard should show the different runs.

Azure 12 MLE preview.JPG

We can click on the different executions and see the details.

By now we have grasped the concepts of AML and its ecosystem, configured our environment in Azure, installed the Workbench, configured and next created a sample project and executed it locally.

Hope this was a good introduction and you enjoyed it.


Sources: